
Series: So you want to learn API Testing?
Part 2: Postman

About Me
My name is Matt Gilbert and I have been in the Software Testing field for close to 10 years now. I have my B.S. in Software Development from Western Governors University. I’ve had the opportunity to take on many different roles in varying industries like Insurance, SaaS, Healthcare, as well as contract work. Across these different industries, I also gained experience with several different testing techniques, which we will discuss in a later publication. These include API testing, Integration, Performance, Accessibility, UI, Usability, Mobile, Contract, as well as automation framework development in Java, C#, Typescript, and Python. You can find me on LinkedIn. Let’s connect!
Intro
Hopefully, you’ve gone over the first article in this series below. If not, I highly recommend checking that out prior to reading this one!

Prerequisites
Setting up Postman
Once you have Postman downloaded and installed, you will need to create a free account. By default, when you log in, you will be inside of a “workspace”. A workspace in Postman is where you can store all of your requests, and environment variables, and create collections, or folders, to keep your requests organized. Go ahead now and create a collection inside of your workspace. You can name this whatever you like.
Now it’s time to add our first request! To do so, click “Add a request” as shown below.

You should now see a blank request which defaults as a GET. The endpoint we will first add to our request is
https://pokeapi.co/api/v2/pokemon?limit=1000&offset=1You can name this request “Get All Pokemon”.
Hit SEND and you should now see data come through!
Perfect, now we can move to the next step, creating an environment variable!
Creating An Environment Variable
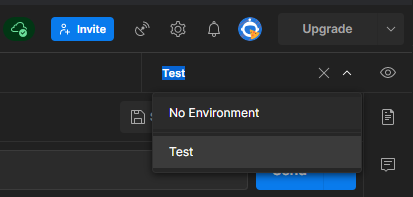
An environment variable can be used and reused across multiple tests. It can change in value depending on what data is pulled, but first, we must create it. In the sidebar, click “Environments”. This will bring up a screen like the one below.

Click “Create Environment” and name the environment whatever you like. Next up, create a named Variable called PokemonName. To actually access the environment variable we created we need to select the environment from the top right corner of Postman.
Finally, on our request, add the below code snippet to the Tests tab and run it.
const jsonData = JSON.parse(responseBody);
pm.environment.set("PokemonName", jsonData.results[33].name);
This should look pretty familiar. What the 2nd line is doing is setting a variable named PokemonName to whatever value is inside jsonData.results[33].name. You can change the number to whatever you like if you want a different PokemonName.
Creating Your First Test
We will be adding a new request to our collection now that hits this endpoint now:
https://pokeapi.co/api/v2/pokemon/{{PokemonName}}{{PokemonName}} is the environment variable we created! This holds and stores the value of whatever we pull from the first request.
What this next request does is get the data for a particular Pokemon. If you hover over the variable name in the request, you can see what the variable is set to!
Go ahead and hit SEND so you can see what the data looks like that it returns.
Now inside your Tests tab add the below code snippet. This is just a sampling of what tests you can add.
const jsonData = JSON.parse(responseBody);
pm.test("Status code is 200", function () {
    pm.response.to.have.status(500);
});
pm.test("Response time is less than 200ms", function () {
    pm.expect(pm.response.responseTime).to.be.below(2);
});
pm.test("abilities is an array", function () {
    pm.expect(jsonData.abilitie).to.be.an('array');
})
pm.test("ability is an object", function () {
    pm.expect(jsonData.abilities.ability).to.be.an('object');
})
You might notice that the tests all fail.
Your task is to get these tests to a passing state. Take a look at the ChaiJS assertion documentation as well as the documentation for Postman for more information on the capabilities you can add! How many tests can you add? Which ones would be beneficial? Try adding some more and reading through the documentation!
Outro
Thanks for reading! Hopefully, you were able to follow along and see how easy it is to utilize this tool for your API testing.
Keep on the lookout for my next article!